Mastering Light and Shadow: A Guide to Creating Depth in Drawing
1. Basic Concepts: How the Eye Perceives Light and Shadow
Before diving into techniques, let’s understand the visual science:
- Light: Electromagnetic waves that reflect off surfaces and enter the eye, creating visual perception.
- Shadow: The absence of light due to an obstruction.
- Visual Depth: The illusion of distance created by contrast between light and shadow.
2. Types of Lighting and Their Psychological Effects
A. Direct Lighting (Directional Light)
- Source: Strong light from one direction (e.g., sunlight or a lamp).
- Effect: Sharp shadows, high contrast, drama (as seen in Caravaggio’s paintings).
- Use: To focus on a central element in the composition.
B. Diffused Lighting
- Source: Indirect light (e.g., a cloudy day).
- Effect: Soft shadows, subtle gradients, a calm atmosphere.
- Use: Romantic scenes or feminine portraits.
C. Rim Lighting
- Source: Backlighting that outlines the subject.
- Effect: Highlights edges, separates the subject from the background.
- Use: Character art in films or comics.
3. Elements of Light and Shadow: The Magic Keys to Realism
A. Core Areas in a Lit Object
- Highlight: The brightest area where light hits directly.
- Midtone: Transition between highlight and shadow.
- Core Shadow: The darkest area unreached by light.
- Reflected Light: Subtle light bouncing from nearby surfaces.
- Cast Shadow: The shape of the object’s shadow on another surface.
B. Shadow Laws: How Shadows Change with the Source
- Distance: The farther the object from the surface, the longer and softer the shadow.
- Angle: High light creates short shadows; low light elongates them.
- Intensity: Strong light = sharp edges; weak light = blurred edges.
4. Techniques for Achieving Visual Depth: From Flat to 3D
A. Aerial Perspective
- Principle: Distant objects lose clarity and take on a hazy tone (usually blue or gray).
- Application:
- Soften background colors.
- Reduce contrast in distant areas.
B. Color Gradient
- Steps:
- Start with a light base layer.
- Add gradual shadows using darker tones (avoid pure black!).
- Tip: Use complementary colors for shadows (e.g., blue for orange shadows).
C. Sfumato Technique
- Origin: Leonardo da Vinci’s method in the Mona Lisa.
- Application: Blend edges between light and shadow until they melt together.
- Tools: Soft brushes or fingers for blending.
D. Optical Distortion
- Concept: Distort shapes near shadows to enhance depth.
- Example: Elongate a tree’s shadow to make the ground appear sloped.
5. Tools and Materials: Choosing What Suits Your Style
A. For Traditional Art
- Pencils (2H to 8B): For precise gradients.
- Charcoal: For deep shadows and flexible blending.
- Oil Paints: For rich lighting effects.
B. For Digital Art
- Software like Photoshop or Procreate: Use light layers (Overlay) and gradient tools.
- Custom Brushes: “Airbrush” for smooth gradients.
C. Universal Tips
- Study Light Sources: Photograph daylight or use a lamp for practice.
- Art References: Analyze works by masters like Rembrandt or Vermeer.
6. Practical Exercises to Hone Your Skills
Exercise 1: Sphere Study
- Draw a circle with a pencil.
- Define a light source (e.g., top-left).
- Add a highlight, core shadow, and reflected light.
- Blend gradients with a finger or sponge.
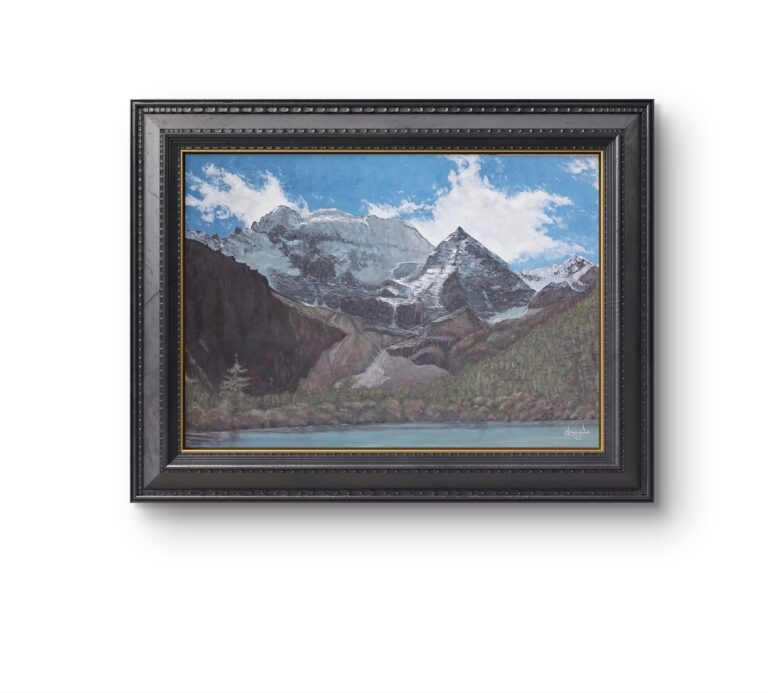
Exercise 2: Landscape with Aerial Perspective
- Paint distant mountains with muted colors.
- Add foreground trees with sharp details and rich colors.
- Use short shadows for distant mountains.
7. Common Mistakes and Solutions
| Mistake | Solution |
|---|---|
| Flat Shadows | Add gradients between light and shadow. |
| Ignoring Reflected Light | Add a light tone to shadow edges. |
| Conflicting Light Sources | Stick to one light direction. |
| Overusing Black | Use warm or cool tones for shadows. |
8. Inspiration from Masters
- Caravaggio (Chiaroscuro): Used stark contrast for drama.
- Claude Monet (Impressionism): Captured color shifts in different lights.
- Ai Weiwei (Contemporary Art): Turns shadows into narrative elements.
FAQs
Q: How do I fix an over-shaded area?
A: Use a kneaded eraser (traditional) or digital eraser.
Q: Can I achieve depth without shadows?
A: Yes, using cool colors (recede) and warm colors (advance).
Q: What’s the best way to study light?
A: Draw eggs! Their spherical shape reveals all lighting elements.
Conclusion: Light and Shadow—The Dance of Opposites That Brings Art to Life
Drawing is not just replicating what you see—it’s the art of deceiving the eye through light and shadow. Every brushstroke, every gradient, is a dialogue between reality and imagination. Start with simple experiments: observe how light falls on your coffee cup or how shadows wrap around a flower, then translate that magic onto your canvas.
🎨 Remember: The artist isn’t one who paints light, but one who makes shadows dance with it!
(Final Tip: View your artwork under different lighting (morning, evening) to see its personality shift!).